
 |
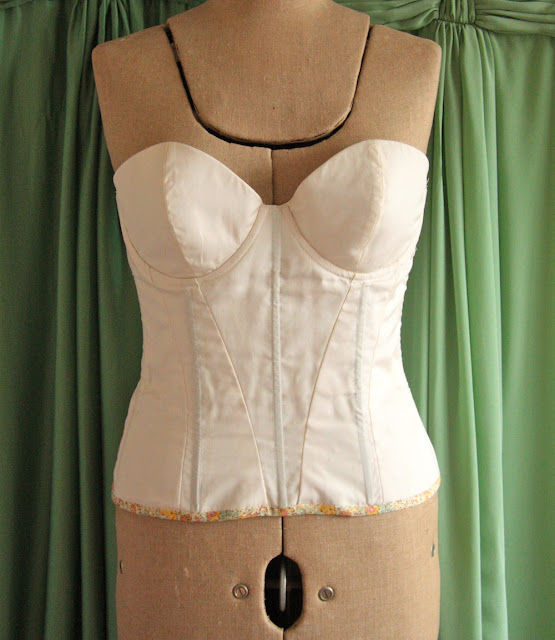
| This is my Bra Based Bodice |
The inspiration for creating a bra based bodice shape came from Marfy's 2630 pattern which I have never set eyes on, but have seen the finished bodice, as below:
 |
| This image is of the Marfy 2630 bodice from Poppy Kettle's website (click image to go there) |
As you can see, they are very similar, this is because I relied on the Marfy visual to create my own bra based bodice. The major difference is that my bra has been created for large busts DD+ as both a functional support bra and formal gown outerwear. My bra based bodice also has extensive boning all around the waist to lend the required support and structure. Like the Marfy, it is lined internally and externally. I have also added a wide strip over the cups to enforce the stylistic idea that it is a formal wear garment. You can't see it here as my image on the right is already lined but I have also used the save V boning channel as the Marfy appears to have. My V channel is actually a double channel on each side before the side channels start and wrap all the way around. Again, this has been created for support.


Who knew such a visually simple garment could cause so much hassle?
When it comes to creating the bodice, you can follow any pattern, it's really very basic sewing. When it comes to creating and using channels to insert spiral boning into for support, I recommend that you take a class on corset making to learn these fundamental sewing techniques. The Craftsy one I used is listed beneath this post. I highly recommend it as I found Allison Smith to be a great tutor and personally very helpful.
Of course, corsets are not bras and do not have this bra style look about them. For that, you have to create your own custom cups to sew into a bodice base. What is unusual about this bra is that it has no stretch. It is fashioned out of coutil which is very stiff corset fabric. It is then lined for comfort. So the template you create has no 'give', you are creating a bra that is immediately outerwear and the fitting is like stepping into a coutured fabric shell.
This is how I created the coutil bra to sew into the bodice
Start with a normal bra that fits you well
It must be padded to the degree that it has shape

thoroughly layer the external cup with masking tape - thick enough to serve as a template

Like this. You can see in the background that it took several goes for me to understand which process would work. I started out pinning the bra extensively to map out a pattern. Don't waste your time. Go straight with this masking tape method.

Gently remove the tape, keeping the shape in tact

Maintaining the cup shape, draw in 'segments'
In this image you can see 3 segments. I ended up using 4 segments (below)
The amount of segments you draw in depends on the cup size
Smaller busts will be fine with 3 segments, larger busts will require 4

Carefully and accurately cut out your segments, one at a time to create templates

This is an extra piece I drafted over the template pieces to add a wide stylistic strip on top of the bra
It's optional

These are my bra template pieces. I cut them out individually, then connected them 'flat'

and this is my bra in segments, ready to be sewn together for the first fitting

It looks like this

seam detail

Treat this bra as a garment - stitching neatly and pressing open seams
This is the inside, turned inside out

Both my coutil cups

a sight for sore eyes- my beautiful, 3D cup. I was so happy when I held it in my hand!

Now it's time to sew the cups into your bodice base and alter as required. As you can see, I had a few minor alterations to deal with at this stage. What you are looking at is only coutil.
After this stage, line inside and out.

The finished bra based bodice
In this image the bodice is lined with the wedding dress fabric on the outside
and lining fabric on the inside

Clean, simple lines
a perfect fit ready to be sewn into the skirt.
And the best bit? This coutil bra is so structured that no other bra is required, for this bodice IS the bra. The fit is also so fitted that no stay is required to be sewn in. This is important as I see so many brides 'wiggle' into their dresses throughout the day and I think it's so unfair that they have to do this. It's something which should never happen and could so easily be prevented if bridal shops simply bothered to sew in basic stays! Of course, if you sew a bra based bodice like this one, you won't need one. My DD was busy all day, got in and out of a helicopter and wore her dress to dinner and never had to wiggle once - all thanks to this bra based bodice.
movement = no problem and no wiggle

I'm ahead of myself showing these photos because, by the time I'd finished the bodice, I hadn't even stitched the skirts, but I did want to show you here how important the bra based bodice was to the dress - and this photo shows it.

The bra based bodice was the icing on the cake after all my bodice and bra making dramas. Before it came along I was trying to make ordinary bodices do extraordinary things - which they simply couldn't. How I wish I'd started a bra based bodice first!
It took me so long to conquer bodices and get to this final version, that I was sewing the wedding dress 24 hours before the wedding. In my next post I'll blog about what I did next, against the clock, to finish this dress on time.
-------------------------------------------------------------------------------
In September 2016 I made my DD's wedding dress using the Butterick Pattern B5731 as a starting point. I then created my own variation of a semi corset with a built in bra as a replacement to the pattern bodice. I took the Craftsy online class 'Sewing Corsets' with Alison Smith which I can recommend as essential viewing for anyone interested in sewing corsets or formal wear bodices with corset elements. In fact I even received personal advice from Alison and am happy to recommend this class to anyone who's interested.

Fabulous post, Esther! Thank you for sharing such a high level of detail. A strapless evening dress that doesn't require tugging all night long is like the stuff of dreams...
ReplyDeleteWow, it came together beautifully!
ReplyDeleteIf there was a Nobel Prize for sewing, Esther - you would be the winner. What a tour de force!!
ReplyDeleteSuch a beautiful dress!
ReplyDeleteHi Esther, sorry to be a bother but I was wondering if one of your posts has more details on how the lace was shaped over the bodice? Did you drape it on the stand? It looks like one piece, is it darted to fit and only connected to the bodice at the side and centre back seams? thanks so much. The end result looked so fab! Definitely worth all the hassle.
ReplyDelete